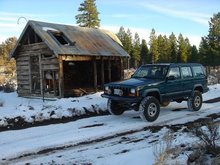
For the first half of my long arm build I will cover the crossmember build and the lower long arm build. This suspension design is what many would call a radius style long arm. Although it doesn't have the traditional radius arms that are found on Fords it does have a type of radius arm in that the upper and lower control arms don't move independetly of each other. The first picture is of my humble XJ always willing to entertain me. Poor thing.

Here is a picture of my old "booty fab" short arms. I originally lengthened my stock arms to accomidate my 4.5 inch rubicon express springs knowing that I would be building long arms eventually. Lots of people frown on using the stock control arms and lengthening them, but I had no problems and did a quality job of fabbing them up. I say if it works and you are on a budget then who cares although, I do think it is "ghetto fab". Don't worry, the long arms are much higher quality.
I had my crossmember brackets cut out on the water jet. They are soo pretty. Just for the record this whole build has no original ideas on my part. I just copied what I have seen in other people's builds. I can't take credit for anything, but the actual fab work on my XJ.

Here are all the bushings and joints I ordered. The bushings and threaded rods I got from suicidedoors.com and the flex joints are from PORC. The threaded inserts are for 2x2x1/4" square tubing.

Here is a bushing all welded up and painted ready to be installed. That is 1 1/8" threaded rod. Plenty beefy for me and comes ready to weld to your sleeve.

I made the crossmember out of 2x4x3/16" tubing and recessed a spot for the tranny mount to sit in. I also had to cut out a notch to clear the exhaust. I then welded some 2x2x1x4" angle to each end to mount it under the frame.

I decided to make my control arms out of square tubing for two reasons. Square is stronger than round when it comes to bending strength (like slamming the arms down on a rock), and 1/4 square is so much cheaper than 1/4" DOM round. I would not use HREW round for this type of application mostly because of the lack of dent protection that it gives compared to DOM. I shouldn't have those problems with square though. It may not be as pretty as round, but it will suffice for me.

Flex joints at one end and urethane bushings at the other. You will need a bushing that is 2 5/8" wide for the axle end of the lower arms and whatever size you want to make fit for the crossmember side.

This picture shows how I ended up puting the brackets on the crossmember. Adding the cross support to the two brackets makes for a much stronger purchase point.

Waiting for paint.

Look how shiny and pretty it is.

Just needs a few diagonal cuts on the angle to clean it up and then its going in.

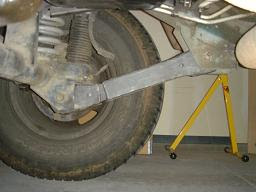
Here are the lower arms all finished up. I will be adding the uppers next weekend as I ran out of time this weekend. I am not especially happy with the loss of ground clearance from the arms hanging down so low, but the flat angle will make it ride much better and flex great. I have seen many of these builds where the arms are mounted up higher between the frame rails, but I didn't have a good way to raise my crossmember that high and I didn't want my brackets to be mounted on the top side of the crossmember. You have to give a little to take a little I guess.

From the axle looking towards the crossmember. You can also see where I cut the old lower arm brackets off. This was one of the biggest pains of the whole build. These things were not meant to come off. I ended up using a cut off wheel on a grinder and a sawzall. Without the sawzall it would have been much more difficult.

From the back looking forward. The new arms are slightly more triangulated than the stock ones.

Mostly flat and plenty beefy. More to come next week and hopefully a trail test with some good pictures.

 The uppers are made with the same 2x2x1/4" tubing as the lowers were made from and all the flat stock/brackets are also out of 1/4". It ended up being a little bit of a challenge getting the 2 inch tubing to fit next to the differential and driveline on the driver side. It worked out fine though I just had to be pretty careful about where I located the brackets on the lower arms.
  Here is a few shots of the finished product. You can see that I mounted my brackets in position so as to clear the frame rails on uptravel.
  Like I mentioned above I am very happy with how this all turned out. The "Butt Dyno" tells me that it rides much smoother and doesn't feel like all the suspension work is being transfered directly to the frame. This setup should allow for the springs to do more of the work. I am heading out on the trail tomorrow to test it all out. Check the trips page to see my write up of how it works off road.
  The only issue that I have at the moment is that my flex joints are making a little noise. I haven't ever used these joints in suspension before and I don't know how much noise to expect from them since they are still considered are "hard" joint by most. I will probably discontect them and tighten them up a little as well as make sure they are good and greased and then see how they are. If it get too annoying I can always replace them with regular bushings even if I do give up a little flexibility.